
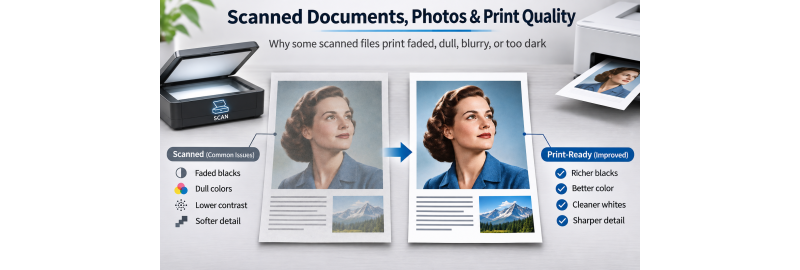
Why Scanned PDFs Sometimes Print Poorly — And How to Get Better Printing Results
Understanding faded colors, washed-out blacks, blurry images, poor contrast, and other common problems when printing scanned documents.
Have you ever submitted a PDF for printing, only to discover that the finished copies look lighter, darker, blurrier, or less colorful than you expected?
Perhaps the colors in your photographs appear dull, the blacks look faded, or certain images seem darker than they did on your computer screen. Maybe the text isn't quite as sharp as you expected, even though the document looked perfectly acceptable when you uploaded it.
At Best Value Copy, we understand how disappointing this can be. We want every customer to receive professional-quality prints, whether they're ordering color copies, black-and-white documents, booklets, catalogs, manuals, or other printed materials.
However, one of the most important factors affecting the quality of your finished printing is something that happens before your order ever reaches our printers: how your original PDF was created.
Scanned documents can present unique challenges because the scanning process itself may introduce imperfections that affect the final printed result.
In this article, we'll explain why scanned PDFs sometimes print poorly, what causes these issues, and how you can prepare scanned documents for the best possible printing results.
1. Not All PDFs Are Created Equal: Scanned PDFs vs. Digital PDFs
One of the most common misconceptions about printing is that any file saved as a PDF is automatically ready for professional printing.
Unfortunately, that's not always the case.
A PDF created directly from software such as Microsoft Word, Adobe InDesign, Illustrator, or another design application can contain sharp text, high-resolution photographs, and precise color information.
These digitally created PDFs often contain vector-based text and graphics that can be printed with exceptional clarity.
A scanned PDF is fundamentally different.
When you place a document on a scanner, the scanner captures the page as a digital image. Everything on that page, including text, photographs, colors, and graphics, becomes part of the scanned image.
Even if you save that image as a PDF, it is still essentially a digital photograph of the original document.
During scanning, several things can happen:
-
Colors may become less vibrant or shift in appearance.
-
Black areas may appear lighter or washed out.
-
Bright areas may lose detail.
-
Text and graphics may become less sharp.
-
Fine photographic details may be lost.
-
Shadows may become excessively dark.
-
Unwanted background colors or scanning artifacts may appear.
When the scanned PDF is printed, these characteristics can carry through to the finished product.
Simply saving a scanned document as a PDF does not automatically improve its image quality or make it print-ready.
2. Why Do Scanned Colors Sometimes Look Faded, Dull, or Inaccurate?
Color reproduction is one of the biggest challenges associated with scanned documents.
When you scan a colorful brochure, photograph, magazine page, or other printed material, the scanner must interpret the original colors and convert them into digital information.
Unfortunately, the scanner does not always reproduce those colors accurately.
A bright red might become slightly dull. A rich blue may look washed out. Skin tones may become too warm, too cool, or slightly unnatural.
These differences can occur for several reasons.
Scanner quality and settings
Not all scanners capture color equally well. Consumer scanners, office multifunction printers, and professional imaging scanners can produce very different results.
Automatic settings may modify brightness, contrast, saturation, and color balance without the user realizing it.
Color profiles and color management
Digital images use color spaces and profiles to describe how colors should appear.
Scanners commonly create RGB images, while many commercial printing systems use CMYK inks or toners to reproduce color on paper.
Converting between these color systems requires color management.
When files have missing, incorrect, or incompatible color profiles, the printed colors may not match the original image or what appears on your screen.
Limitations of the original printed material
If you scan an older photograph, faded document, or previously printed image, the scanner records the colors that remain in that physical original.
For example, if an old photograph has developed a yellowish tint, the scan will generally capture that discoloration.
Without additional image correction, those altered colors may also appear in the finished print.
The printing process cannot automatically restore colors that were never accurately captured in the scanned file.
3. Why Do Blacks Sometimes Look Gray or Washed Out?
Another common problem involves scanned documents that contain dark photographs, black backgrounds, bold graphics, or black text.
Customers sometimes expect these areas to print as deep, rich black, but the finished copies may appear gray or faded.
The reason may be found in the scanned file itself.
When a scanner captures a dark area, it doesn't necessarily interpret that area as solid black.
Instead, the scanner may record various dark gray values.
A black background on the original page might be captured as dark gray, particularly if the scan was made using automatic brightness settings or from an older or faded original.
When the image is printed, the printer attempts to reproduce the tonal information contained in that file.
If the scanned black is actually dark gray, the printed result may appear lighter than expected.
This can affect both black-and-white and color documents.
For example, a scanned color photograph might have vibrant blues and reds but weak, faded shadows. Similarly, a scanned black-and-white photograph may lack the deep blacks necessary to create strong contrast.
While adjustments can sometimes improve these images, they generally require editing the digital file rather than simply printing it.
4. Why Do Some Scanned Images Print Too Dark?
Interestingly, scanned documents can also experience the opposite problem: images that print too dark.
This is particularly noticeable in photographs containing people, dark clothing, shadows, or detailed backgrounds.
A computer monitor produces its own light, while a printed page depends on reflected light.
This difference alone can make an image appear brighter on a screen than on paper.
Additionally, scanning software may produce images with poor tonal separation.
For example, a photograph of someone wearing a black jacket might contain several subtle shades of dark gray that help distinguish the fabric, folds, and shadows.
If those tonal differences are lost during scanning or subsequent editing, the jacket may print as one large dark area.
Similar problems can occur with faces, hair, and other important photographic details.
Why not simply increase the contrast?
You might assume that making an image darker or increasing its contrast will automatically improve the result.
Unfortunately, aggressive adjustments can create new problems.
Darkening an image too much can cause shadows to merge together, eliminating important details. Increasing contrast excessively can also make highlights too bright and reduce natural-looking skin tones.
Professional image adjustments often involve carefully balancing highlights, midtones, shadows, and overall color.
The goal is not simply to make an image darker or more colorful, but to preserve a natural balance of detail, contrast, and color.
5. Why Scanned Photographs Can Lose Sharpness and Detail
Scanning can also affect the apparent sharpness of photographs and text.
This is especially common when scanning older printed photographs, newsletters, newspapers, brochures, catalogs, or other materials that have already gone through a printing process.
Each time an image is reproduced, there is an opportunity for detail to be lost.
For example, a photograph may begin as a high-resolution digital image.
It is then printed onto paper, where the printing process converts the image into tiny dots of ink or toner.
If that printed photograph is subsequently scanned, the scanner captures the printed reproduction rather than the original digital photograph.
When that scan is printed again, another reproduction process occurs.
This means the final print may be several generations removed from the original digital image.
Even sophisticated commercial printers cannot completely recreate details that were lost during previous reproductions.
Halftone patterns and moiré
Most printed photographs are reproduced using tiny dots known as halftones.
When an already-printed photograph is scanned, the scanner may capture these dot patterns.
Reprinting the scanned image can create visible interference patterns called moiré, which may appear as unusual textures, wavy patterns, or areas of inconsistent shading.
These problems are particularly noticeable in photographs, clothing, textured backgrounds, and areas containing subtle color gradients.
Some scanners include a descreen setting that can help reduce these patterns.
Whenever possible, using the original digital photograph instead of scanning a printed copy will provide better results.
6. Scanning Resolution: Why DPI Matters
Resolution plays an important role in determining how clearly scanned documents will print.
Scanning resolution is generally measured in DPI, or dots per inch.
A scan created at a low resolution may appear reasonably clear when viewed on a small computer screen. However, when printed at full size, the image may look soft, blurry, or pixelated.
For most printing applications, we recommend the following scanning resolutions:
| Type of Document | Recommended Resolution |
|---|---|
| Standard text documents | 300–600 DPI |
| Documents with small text | 600 DPI |
| Color photographs | 300 DPI |
| Black-and-white photographs | 300 DPI |
| Documents containing both photos and text | 300–600 DPI |
| Detailed illustrations or line drawings | 600 DPI or higher when appropriate |
These recommendations generally assume that the document will be printed at approximately the same size as the original.
If you plan to enlarge your document significantly, a higher scanning resolution may be necessary.
It's also important to remember that increasing the DPI setting of an image after it has already been scanned does not automatically improve its quality.
If the original scan did not capture sufficient detail, simply changing its resolution or saving it as a higher-quality PDF cannot recreate all the missing information.
7. RGB, CMYK, and Why Colors May Look Different When Printed
Another important consideration is the difference between colors displayed on a computer monitor and colors reproduced on paper.
Most scanners and digital cameras capture images using RGB color information.
RGB stands for red, green, and blue. Computer monitors use these colors of light to produce the images you see on your screen.
Commercial color printing generally uses CMYK: cyan, magenta, yellow, and black.
Because these systems produce color differently, some colors visible on a monitor cannot be reproduced exactly using printing inks or toners.
For example, extremely bright blues, greens, and other highly saturated colors may appear more subdued when printed.
Paper characteristics, printer calibration, lighting conditions, and color profiles can also influence the final appearance.
This doesn't mean that RGB files are necessarily unsuitable for printing. Modern commercial printing systems can often manage RGB-to-CMYK conversion effectively when files contain appropriate color information.
However, a scanned image with inaccurate or poorly managed color information may produce unexpected results when printed.
For color-critical projects, correctly prepared files and physical print samples are especially important.
8. Why Professional Printing Equipment Cannot Automatically Fix a Poor Scan
At Best Value Copy, we've been involved in the printing industry since 1988.
Over the decades, we've seen tremendous advances in digital printing technology, including improvements in resolution, color reproduction, consistency, and production speed.
Today's advanced commercial printing equipment can produce exceptionally sharp text, vibrant colors, smooth grayscale images, and outstanding photographic detail.
However, there is an important distinction between printing a supplied file and correcting the contents of that file.
A commercial printer is designed to reproduce the digital information it receives as accurately and consistently as possible within the capabilities of the printing system.
If a scanned photograph has faded colors, missing details, weak contrast, or distorted tonal values, those characteristics are already embedded in the file.
Correcting them may require additional image-processing work, such as:
-
Adjusting brightness and contrast.
-
Correcting color balance and saturation.
-
Improving faded or washed-out blacks.
-
Balancing highlights and shadows.
-
Cleaning gray or discolored backgrounds.
-
Reducing scanning artifacts or unwanted noise.
-
Improving image sharpness where possible.
-
Restoring faded photographs or correcting individual images.
These corrections can be time-consuming, especially when a document contains many pages, multiple photographs, or different types of scanned material.
Furthermore, there is no universal adjustment that works equally well for every scanned document.
An adjustment that improves one photograph could make another image too dark, oversaturated, or unnatural.
For this reason, professional file restoration and image correction are separate processes from standard document printing.
9. How to Prepare Scanned Documents for Better Printing
The good news is that many common scanning problems can be minimized by following a few simple guidelines.
1. Use the original digital file whenever possible
If you have access to the original Word document, design file, digital photograph, or exported PDF, use that instead of scanning a previously printed version.
This generally provides the clearest text, best colors, and highest-quality images.
2. Scan at an appropriate resolution
Use 300 DPI for most color and grayscale photographs and consider 600 DPI for small text or detailed documents.
Higher resolution is particularly helpful when scanning materials that contain fine lines or intricate graphics.
3. Choose the correct scanning mode
For color documents and photographs, use the scanner's full-color mode.
For black-and-white photographs, grayscale mode generally preserves tonal detail better than simple black-and-white scanning.
For ordinary text-only documents, a black-and-white scanning mode may be appropriate, provided it captures the text clearly.
4. Avoid excessive automatic image corrections
Many scanners offer automatic brightness, color enhancement, contrast adjustment, and sharpening features.
While these settings can sometimes help, they can also unintentionally alter colors or eliminate important detail.
Review the scanned result carefully before finalizing your PDF.
5. Examine both the light and dark areas
Check whether the blacks appear sufficiently dark without losing important details.
Look at faces, clothing, shadows, and other areas containing subtle tonal differences.
Also examine white backgrounds to make sure they don't contain unwanted gray or yellowish discoloration.
6. Check color accuracy
If your document contains photographs, illustrations, or important brand colors, compare the scan with the original.
Look for unusual color shifts, dull tones, or areas that appear too bright or too saturated.
Whenever possible, use properly managed color settings and retain the appropriate embedded color profile.
7. Avoid excessive file compression
Heavy JPEG compression can introduce visible artifacts, especially around text, graphics, and photographs.
For best results, use high-quality image settings or lossless formats during editing and export your final document as a high-quality PDF.
8. Review your PDF at actual printing size
Before uploading your document, open the PDF and examine it at approximately the size at which it will be printed.
Pay special attention to small text, photographs, color reproduction, and the appearance of dark areas.
If something already looks faded, blurry, or poorly defined in the PDF, those problems may also appear in the finished printing.
9. Consider ordering a printed sample
If you're printing a large quantity of documents containing important photographs, detailed illustrations, or color-sensitive material, ordering a smaller test quantity can be worthwhile.
A physical printed sample allows you to evaluate the actual color, contrast, sharpness, and overall appearance before ordering in volume.
10. Can a Poorly Scanned PDF Be Improved?
Yes. In many cases, scanned documents can be enhanced using image-editing software and other digital processing tools.
For example, a faded color photograph may benefit from color correction, improved contrast, and adjustments to highlights and shadows.
A black-and-white photograph may benefit from carefully deepened blacks while maintaining detail in faces and clothing.
Scanned text may become easier to read after background cleanup and contrast adjustments.
However, the extent of improvement depends on the quality of the original scan.
Severely blurry images, missing details, distorted colors, and lost photographic information cannot always be fully restored.
Image enhancement can often improve how a document looks, but it should not be confused with recovering information that was never captured.
If print quality is especially important, it's always preferable to begin with the best possible source file rather than relying on corrections after scanning.
11. What to Expect When Printing Customer-Supplied PDFs at Best Value Copy
Best Value Copy specializes in producing professional-quality printing from customer-supplied PDF files.
Our advanced digital printing equipment allows us to provide high-quality color and black-and-white printing at competitive prices, with fast production and nationwide shipping.
However, our standard printing process does not include individually redesigning, retouching, color-correcting, or restoring customer-supplied artwork.
When you upload a PDF, it's important to understand that the finished print will generally reflect the characteristics and quality of the images contained in that file, subject to normal differences between screen displays and printed output.
If a scanned document contains faded colors, poor contrast, blurry photographs, or weak black density, these issues may be visible in the finished product.
This does not mean that scanned PDFs are unsuitable for commercial printing.
In fact, properly scanned and prepared documents can produce excellent results.
The key is making sure the scan itself is suitable for printing before submitting your order.
We encourage customers to review their PDFs carefully, particularly when image quality, photographic detail, or accurate color reproduction is important.
12. The Bottom Line: Better Scans Produce Better Prints
Scanned documents are an excellent way to preserve and reproduce photographs, historical records, newsletters, books, catalogs, magazines, and other printed materials.
But it's important to remember that scanning is a form of image reproduction, and the scanning process can affect the quality of the final document.
Faded colors, gray blacks, excessive darkness, blurry text, poor resolution, and unwanted scanning artifacts can all influence how a document looks when printed.
Whether you're ordering color copies or black-and-white printing, the quality of the original scanned file plays a significant role in the finished result.
A professional printing company can deliver outstanding results from a properly prepared PDF, but even the most advanced printing equipment cannot automatically correct every imperfection in the original artwork.
By starting with a high-quality scan, reviewing the document carefully, and correcting any visible problems before submitting it for printing, you can significantly improve your chances of receiving the results you expect.
Professional Color and Black-and-White Printing at Best Value Copy
Since 1988, Best Value Copy has been committed to providing high-quality printing, competitive pricing, and fast turnaround times.
Today, we combine decades of printing experience with advanced digital printing technology to serve customers throughout the United States.
Whether you're printing color documents, black-and-white copies, booklets, manuals, newsletters, catalogs, or other materials, we're here to make professional printing affordable and convenient.
With most orders produced within 24–48 hours and no additional charge for fast production, we strive to deliver exceptional value with every order.
Before placing your next printing order, take a moment to make sure your PDF is truly ready for print.
Visit BestValueCopy.com to explore our affordable color and black-and-white printing services.


