
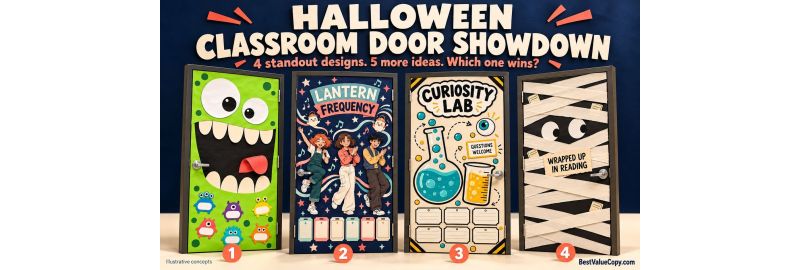
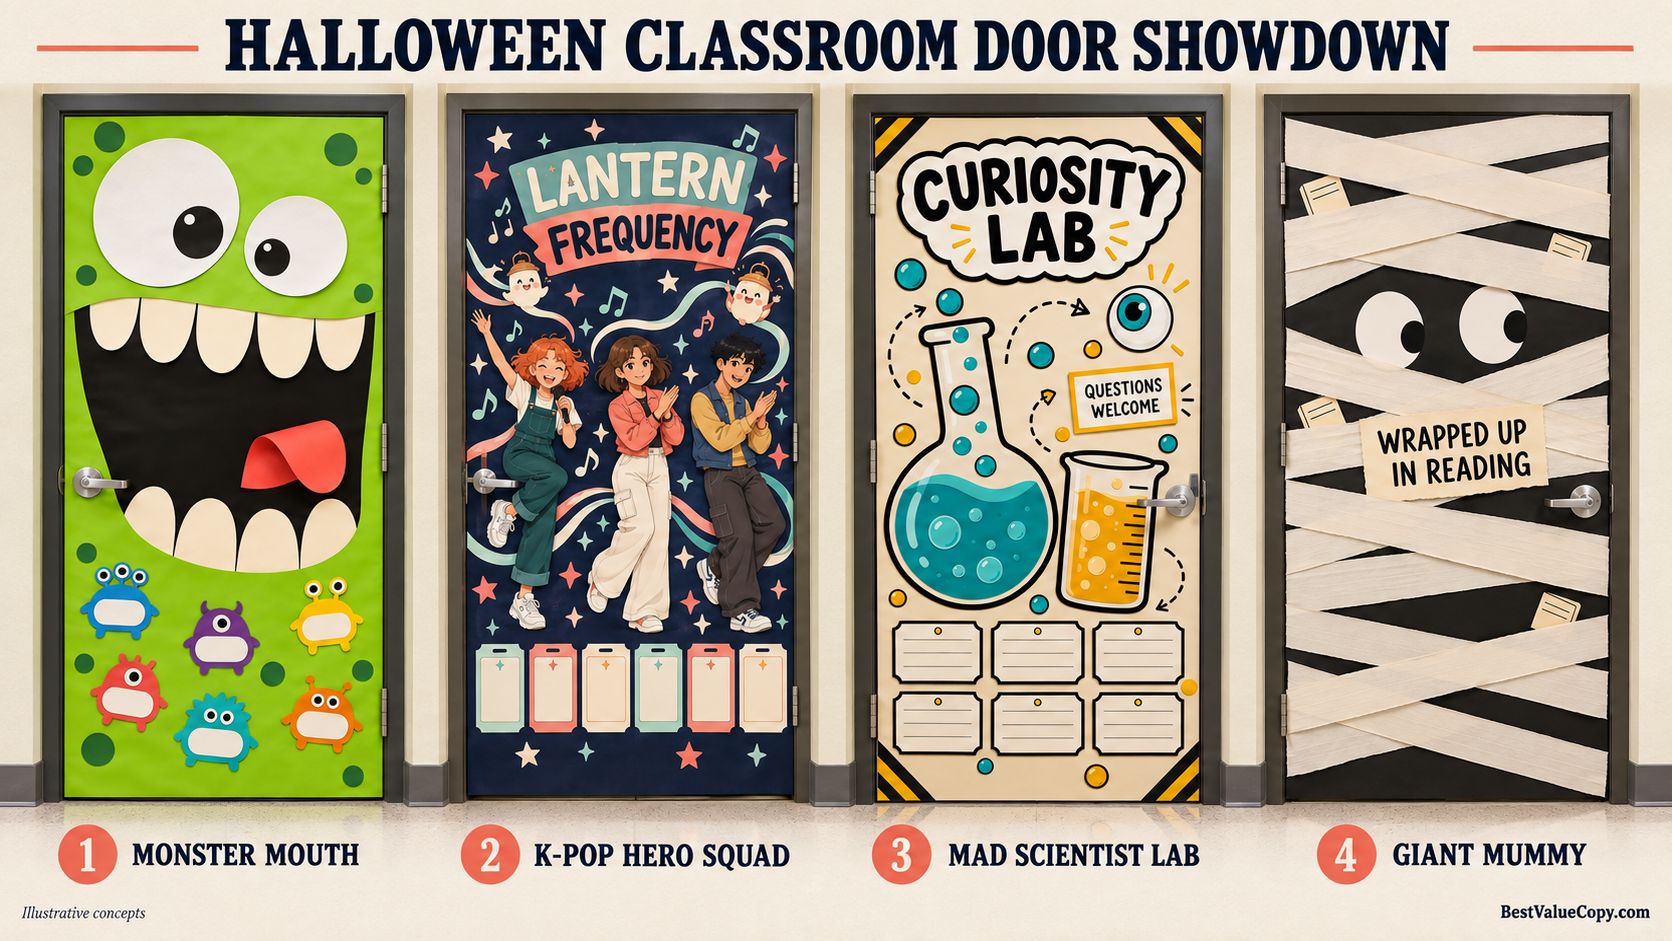
Four classroom doors. Four completely different personalities. A monster with an enormous grin, a supernatural pop squad, a curiosity-filled laboratory, and a mummy that looks more surprised than scary. Which one belongs outside your classroom?
These Halloween classroom door decorating ideas start with four detailed concepts, then add five simpler alternatives. Each includes ways to combine printed details with ordinary classroom supplies, so you can choose a project that fits your students, budget, and available prep time.
Need the quickest starting point? Choose the giant mummy. Want students to help build the display? Try the monster mouth or science lab. Prefer a music-inspired theme for older students? Meet our original K-Pop Lantern Frequency squad.
Before buying materials, check your school's decorating rules, including permitted coverage and materials. Some schools prohibit door decorations. Keep windows, hardware, identification, and door movement clear; use an approved bulletin-board location if doors are off limits. Local requirements vary, as this classroom-door guidance from a fire marshal's office illustrates.
Images are illustrative concepts, not photographs of completed classroom installations or downloadable cutout templates.
1. Monster Mouth: A Big Grin With Room for Everyone
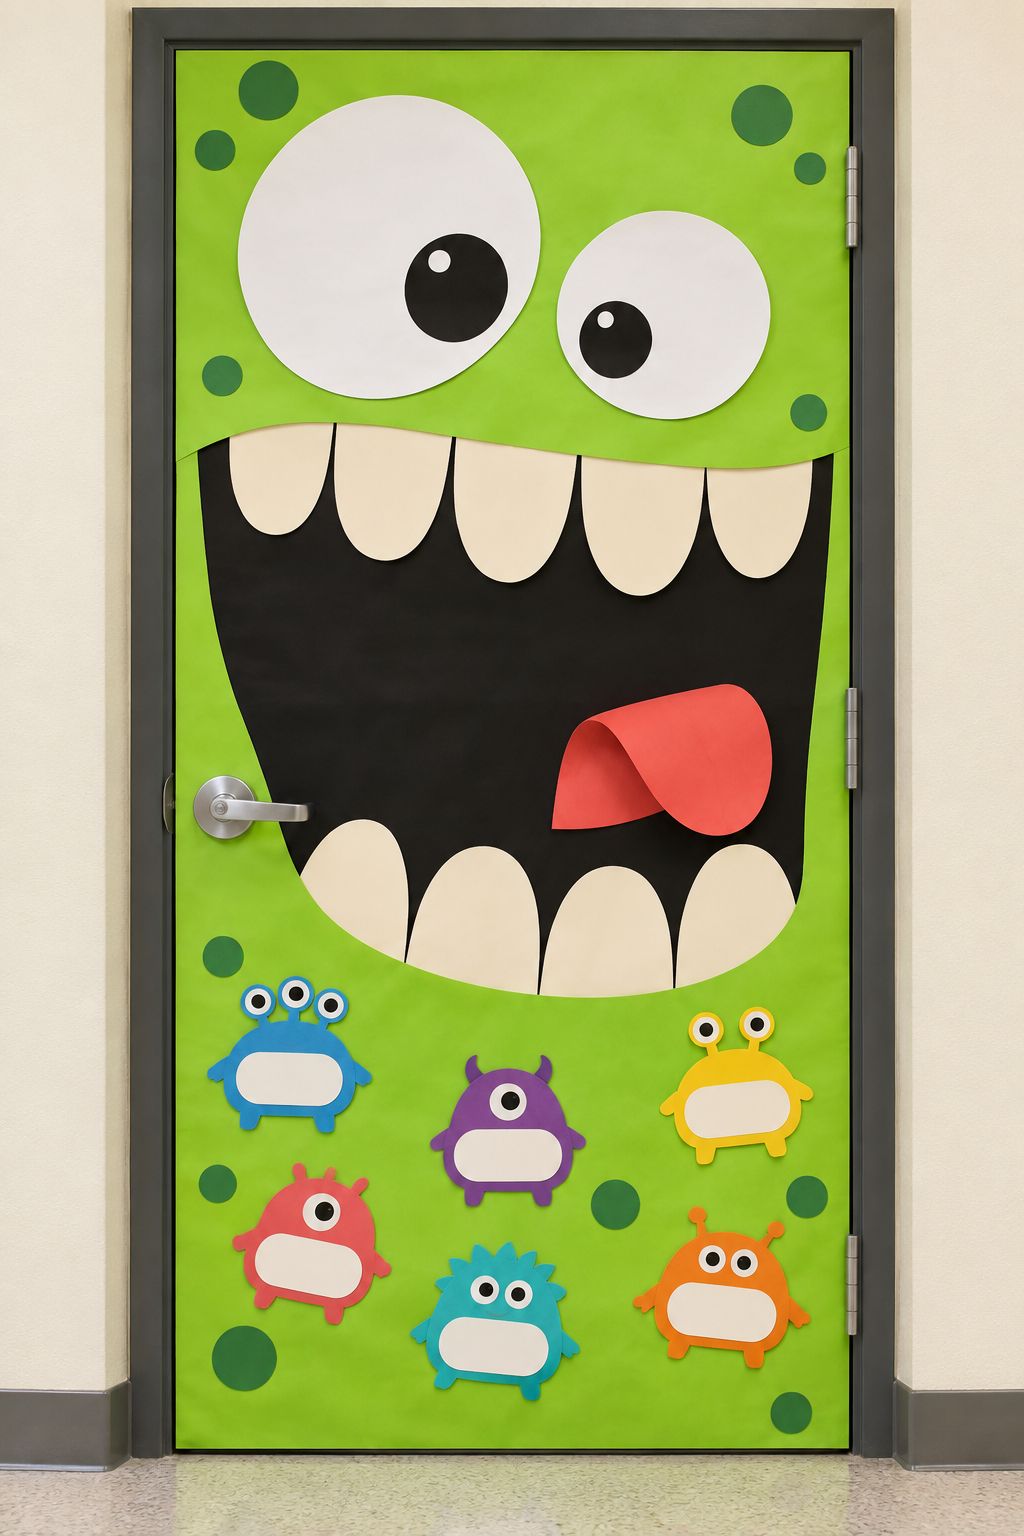
Make the door look like a cheerful monster with oversized eyes, a broad mouth, and wonderfully uneven teeth. The joke should register from the hallway before anyone reads a word.
Start with the eyes and mouth on a paper sketch. Where permitted, use colored craft paper for the large background shapes, then add printed pupils, tooth outlines, and smaller monster cards. Keep the handle outside the artwork's busiest area. Attach pieces to the approved surface without bridging the door and frame.
Give every student a small monster outline to decorate. Add a first name or classroom-approved identifier, then arrange the creatures around the big face. Younger students can compare shapes; older students can write a descriptive sentence about their creature for an adjacent display.
Cost-conscious shortcut: cut the teeth from white paper and print only the expressive details. You do not need to print a door-sized block of green.
The Print Plan
- Difficulty: Easy to moderate.
- Prep level: Moderate cutting and assembly, plus optional student art time.
- Printed elements: Eyes, tooth templates, mini-monster cards.
- Non-printed materials: Colored paper, white paper, scissors, approved adhesive.
- Best use: Elementary classrooms and collaborative art projects.
- Customization idea: A different student-designed creature on every card.
- Printing consideration: Keep eyes large and cutting outlines simple; avoid tiny teeth and narrow paper connections.
2. K-Pop Supernatural Hero Squad: Meet Lantern Frequency
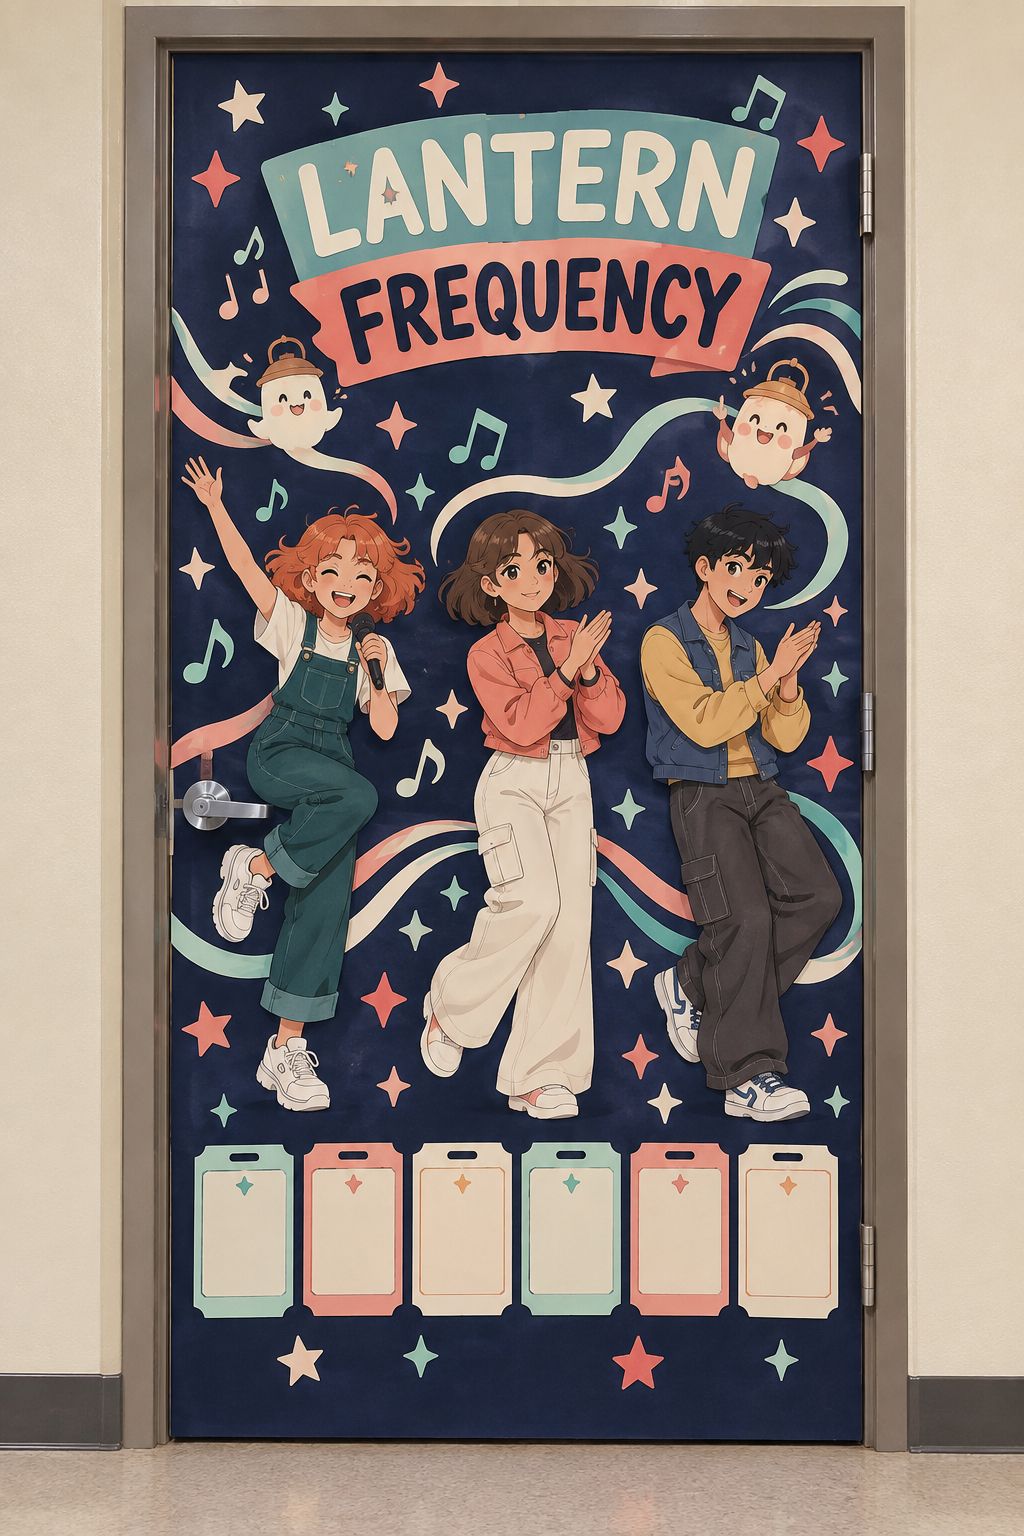
This is the most contemporary, pop-culture-adjacent option in the showdown: an original music group that protects its school from mischievous Halloween sprites through rhythm and sound.
Our fictional group, Lantern Frequency, has three distinct performers: a singer with copper curls and teal overalls, a rhythm-maker with a chestnut bob and coral jacket, and a dancer with short black hair, a mustard shirt, and a blue vest. Paper sound waves, small friendly sprites, and student backstage passes complete the scene.
Build it like a concert poster. Place the group name above three large character prints, with repeated stars and music shapes around them. A limited palette helps the separate pieces feel coordinated. Use broad paper curves for the sound waves instead of fragile, intricate cutouts.
Students can invent the group's mission, design a pass, or write a short rhythm pattern. For music class, turn the passes into rhythm cards. For language arts, add a brief character description.
This is an original classroom fantasy concept with no affiliation to an entertainment property. Create your own characters or use appropriately licensed artwork rather than recognizable film characters. The main investment is preparing the illustrations; simplify the surrounding decorations to keep assembly manageable.
The Print Plan
- Difficulty: Moderate assembly; higher artwork preparation.
- Prep level: Highest of the four if creating character art from scratch.
- Printed elements: Three heroes, group sign, sprites, backstage-pass cards.
- Non-printed materials: Backing paper, paper stars, scissors, approved adhesive.
- Best use: Older elementary, middle-school, music, and creative-writing classes.
- Customization idea: Student-designed passes or original hero profiles.
- Printing consideration: Keep each character on a separate piece; test face detail at its intended print size.
3. Mad Scientist Lab: Questions Welcome
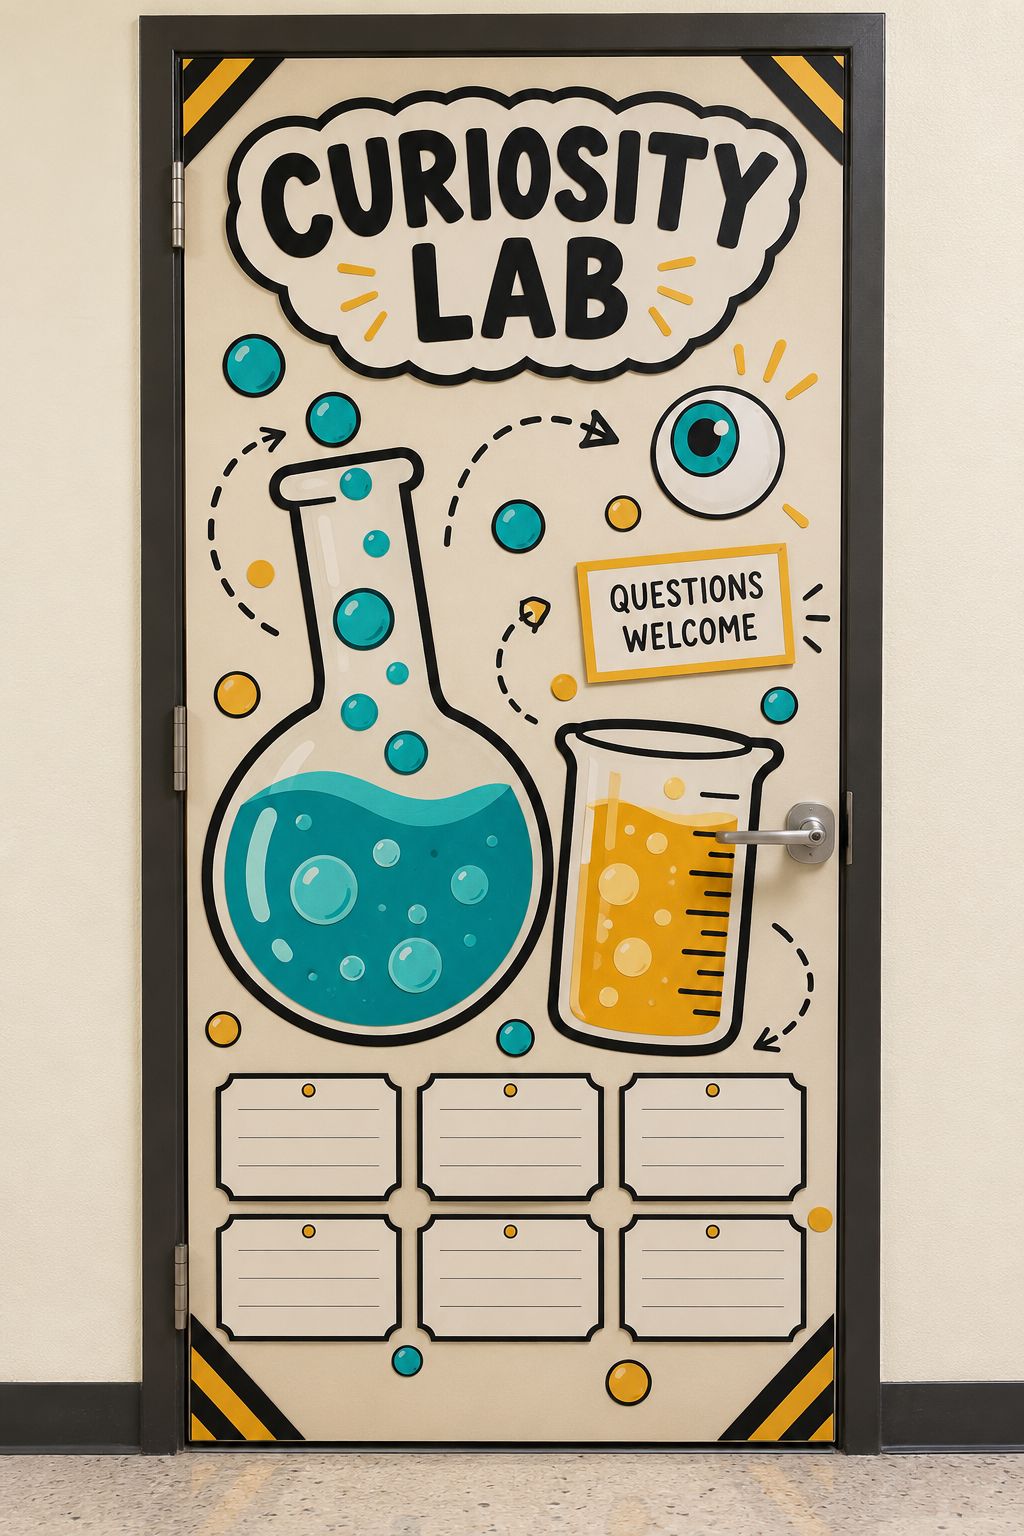
Turn the entrance into a friendly research station with illustrated bubbling beakers, specimen cards, and a large “Curiosity Lab” sign. The visual humor comes from enormous paper experiments, not realistic danger.
Choose one or two large beaker illustrations as the focal point. Add a short trail of paper bubbles and arrange student cards beneath them. Turquoise, amber, cream, and black make a coordinated alternative to an all-orange Halloween display.
Let students create imaginary inventions with clearly fictional labels: a Homework Finder, a Lost Pencil Detector, or a Question Collector. For a science connection, have each student submit a question they would like to investigate. Display accurate learning content separately from the fantasy labels.
Print the beakers and repeated card layouts; use classroom paper for bubbles and borders. Keep everything flat. Illustrated equipment provides the effect without actual glassware, liquids, cords, or props near the entrance.
The Print Plan
- Difficulty: Moderate.
- Prep level: Moderate layout and labeling; easily divided among students.
- Printed elements: Beakers, lab sign, fictional labels, question cards.
- Non-printed materials: Paper circles, backing paper, scissors, approved adhesive.
- Best use: Science rooms, STEM activities, and inquiry-based classroom displays.
- Customization idea: One student question per specimen-style card.
- Printing consideration: Make the sign readable at a glance; reserve small text for close-up reading.
4. Giant Mummy: The Simplest Build
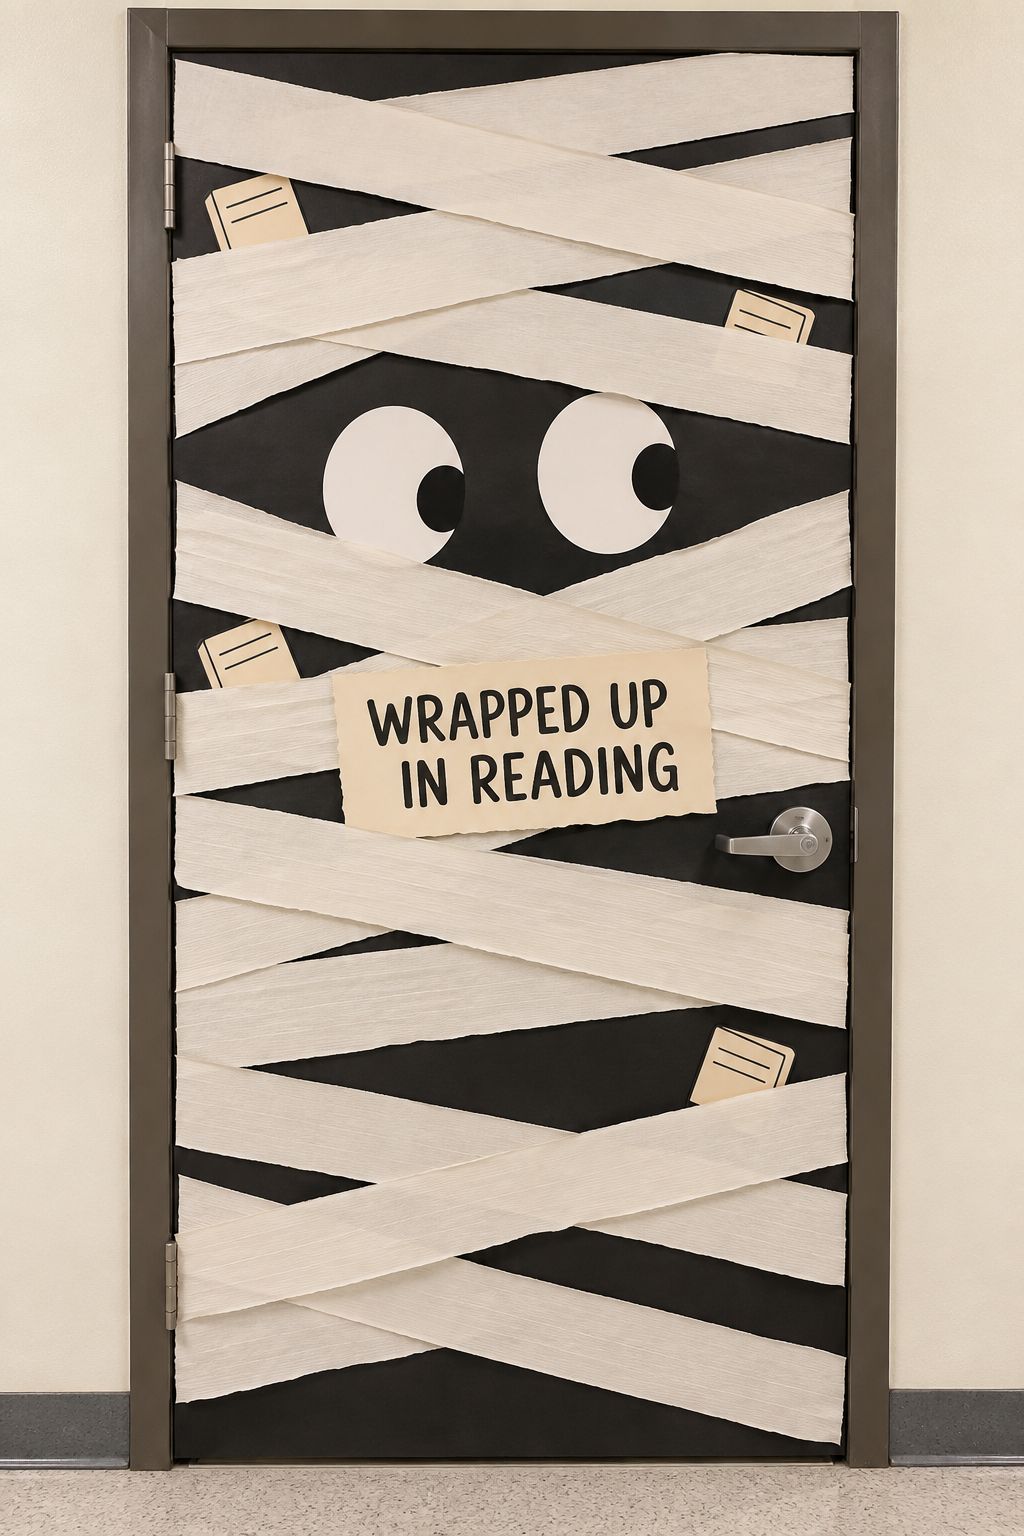
The giant mummy is the easiest of these four concepts because its main ingredients are broad paper strips and two eyes. Slightly uneven strips suit the design, so precise cutting matters less.
Arrange light-colored paper bandages over an approved dark background, leaving a gap for large eyes. Angle the pupils for a surprised expression. Keep each strip flat and secured within the permitted display area; do not wrap the door shut or cover its hardware.
Add a “Wrapped Up in Reading” sign and small book-shaped cards. Students can contribute a book title or a one-sentence recommendation. The same face also works as a smaller bulletin-board panel if a full-door treatment is not permitted.
For the lowest-prep version, skip the cards and print only the eyes and sign. Save those pieces flat for next year and replace the inexpensive strips.
The Print Plan
- Difficulty: Easiest.
- Prep level: Lowest, once materials and permission are ready.
- Printed elements: Eyes, reading sign, optional book cards.
- Non-printed materials: Wide paper strips, scissors, approved adhesive.
- Best use: Limited prep time, reading corners, and younger classrooms.
- Customization idea: Student book recommendations between bandages.
- Printing consideration: White paper and strong black pupils provide contrast without a complicated color file.
Which Halloween Classroom Door Is Easiest to Make?
The giant mummy needs the least design work. Monster Mouth offers a strong visual effect with basic shapes. The laboratory adds more labeling, while the hero squad takes the most artwork preparation. These are planning judgments, not timed classroom tests.
| Design | Difficulty / prep | Visual appeal / classroom fit | Student contribution | Printing / budget approach |
|---|---|---|---|---|
| Monster Mouth | Easy–moderate / medium | Big graphic expression / elementary | Personalized mini monsters | Low–medium print need; craft-paper background and teeth |
| Hero Squad | Moderate build / highest art prep | Music-poster energy / older elementary and middle school | Passes, profiles, rhythm cards | Highest useful print input; reuse heroes and make paper accents |
| Scientist Lab | Moderate / medium | Illustrated experiments / science and general classrooms | Questions and inventions | Medium print need; repeat one card layout |
| Giant Mummy | Easy / lowest | Bold face / younger students and reading displays | Book recommendation cards | Minimal printing; ordinary paper strips do most of the work |
5 More Halloween Classroom Door Ideas
5. Trick or Read
Arrange original paper book spines around a reading sign. Students add favorite titles and a short recommendation. Print the labels; make the books from colored rectangles.
6. Our Classroom Pumpkin Patch
Give each student a pumpkin outline to personalize. Use names, vocabulary words, or math facts. This becomes a fall display without Halloween characters if that better fits your classroom.
7. Bat Cave
Repeat a few simple bat silhouettes in different sizes across the approved display area. Add student-written bat facts on separate cards. Avoid hanging pieces across the doorway.
8. Student Monster Gallery
Turn individual monster drawings into a small exhibition with printed labels. Each label can include the creature's name and an invented habitat. A repeated frame shape makes varied artwork feel cohesive.
9. Ghost Book Club
Give friendly paper ghosts small book-shaped cards. Each ghost introduces a student-selected read. Keep the expressions playful and let the book recommendations change throughout October.
How to Design Your Own Halloween Classroom Door
Measure the permitted display area, choose one focal point, and plan the pieces before printing. A simple sketch prevents ordering artwork that competes with a window or handle.
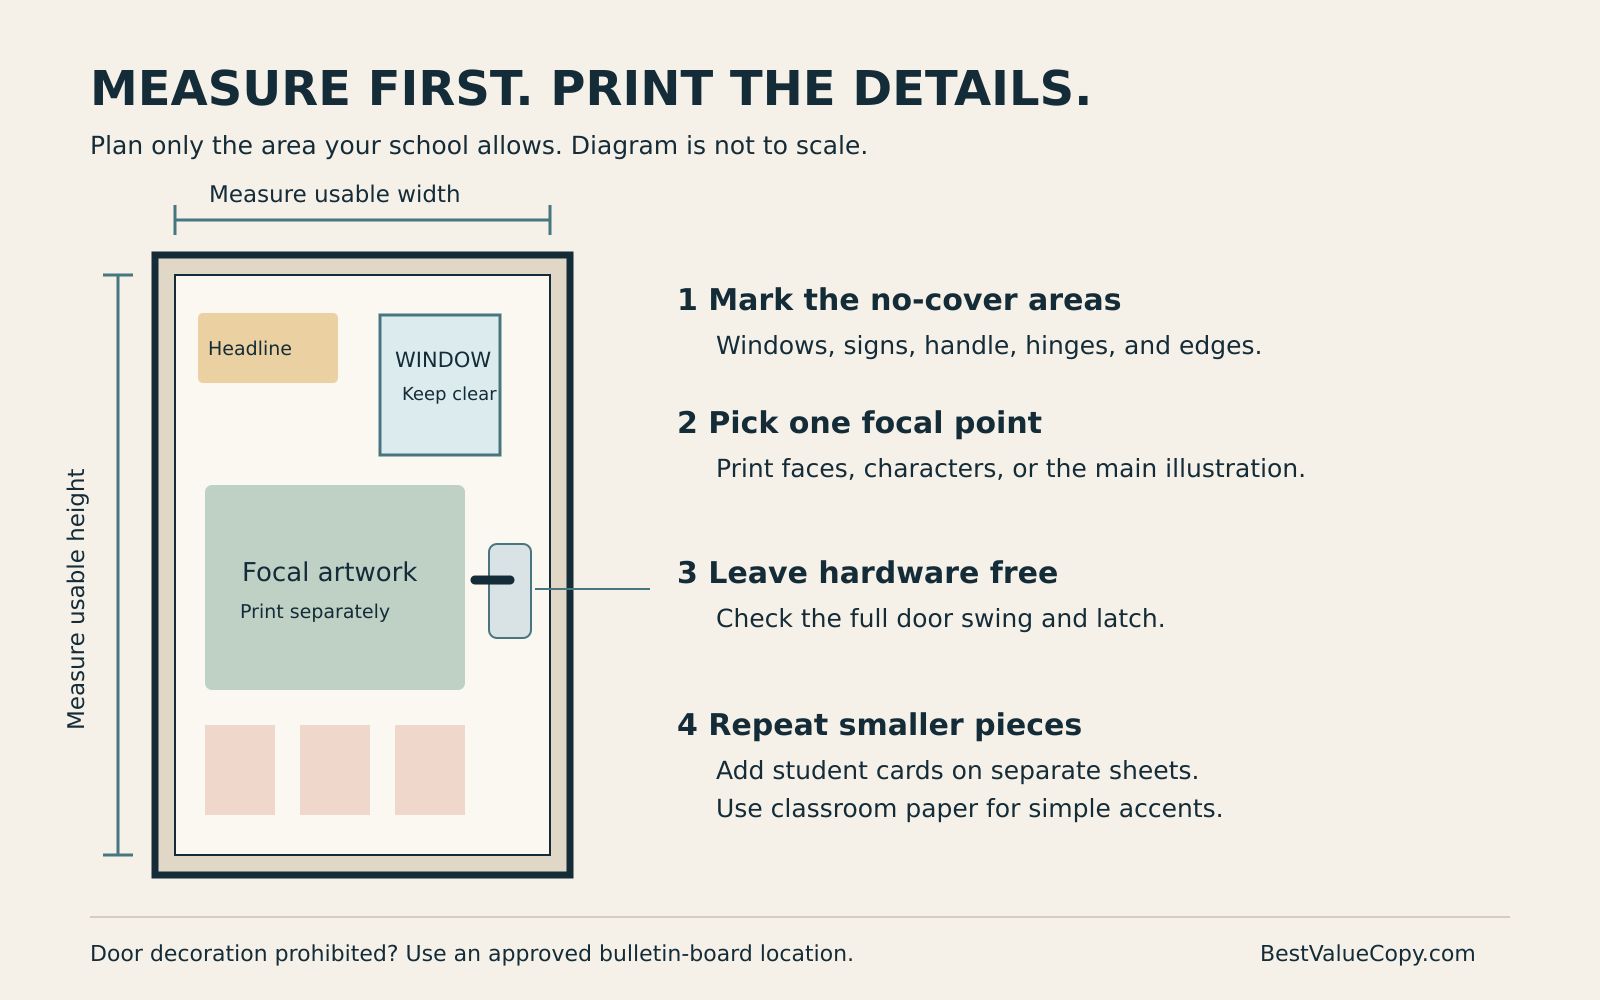
- Map the real surface. Record usable width and height, hardware, windows, signs, and areas that must stay clear. Do not assume every classroom door is the same size.
- Choose a visual hierarchy. Start with the monster's eyes, the hero group, the main beaker, or the mummy's face. Add a short headline and smaller student contributions afterward.
- Separate printing from crafting. Print detailed faces, illustrations, and repeated labels. Use existing paper for large solid shapes, strips, and borders.
- Choose paper for the job. Consider flexibility, stiffness, writing surface, and how pieces will attach. A larger pound number alone does not tell you how different paper categories compare; BVC's paper weight guide explains the distinction.
- Make a sample. Print one eye, label, or character section at final size before producing the whole set. Check both cutting difficulty and readability.
- Plan next year's version. Keep student names separate from reusable artwork. Store dry, flat pieces together with a photo of the arrangement.
How to Print Large Classroom Decorations Without Owning a Large Printer
You can order one larger print, assemble several coordinated prints, tile a PDF across smaller sheets, or combine printed focal pieces with craft paper. Choose according to the artwork, visible seams, budget, and available assembly time.
Use one larger print for a detailed focal point
A poster can keep a character group or laboratory illustration together without seams through the faces. Best Value Copy offers large poster printing. Check the available size and stock for your project before designing; a poster does not need to cover the entire door.
Print separate pieces that work together
Print each hero, eye, or sign separately, then build the composition with paper accents. Color copies can supply smaller graphics and repeated cards, while small posters are another option for focal pieces. Confirm the chosen product's current specifications.
Tile an oversized PDF across smaller sheets
Tiling divides one large design into adjoining printed sections. In desktop Acrobat's print dialog, choose Poster, inspect Tile Scale, and set overlap, cut marks, and labels as needed. Adobe's tiling instructions explain these controls.
Check the preview and test a joining pair before printing every sheet. Trim the required edges, align the artwork, and secure the joins from behind. Avoid placing seams through faces or small text. Browser print dialogs may not offer these controls.
Spend the printing budget on the details
A mummy needs convincing eyes, not printed bandages. A monster needs expression, not an expensive background. Reserve detailed printing for the parts that students will notice, and use materials already available for the rest.
When comparing methods, count supplies, printing, any delivery charges, and assembly time together. Allow time for proofing, production, delivery, and installation; do not treat production time as an arrival promise.
Halloween Classroom Decorating Tips That Make Printing Easier
- Start with sufficient image detail. For close-viewed raster artwork, 300 pixels per inch at final print size is a useful starting point, not a universal requirement for every poster. Follow the printer's guidance; Adobe explains printed image resolution. Enlarging a tiny screenshot cannot recover missing detail.
- Keep lettering live or vector-based where possible. Save a print-quality PDF and inspect it for missing fonts, clipped letters, and unintended blank pages.
- Understand bleed and safe space. Bleed extends background artwork beyond the trim edge; a safe area keeps important content inside it. Follow the selected product's requirements. Use BVC's Canva PDF export checklist when preparing edge-to-edge designs. Cutout sheets with intentional white space need a different layout from a full-bleed poster.
- Choose readable contrast. Test headline lettering from the hallway and labels at closer range. Leave room for student handwriting.
- Proof the colors. Screen brightness and printed color differ. Check a sample, especially for dark backgrounds and subtle face details; the guide to screen-versus-print color explains why.
- Keep extras purposeful. If you add a QR code to a reading list, test the printed code on more than one phone. Leave it out when it adds no useful destination.
Cast Your Vote: Which Door Belongs at Your Classroom?
Monster Mouth, Lantern Frequency, Mad Scientist Lab, or Giant Mummy?
Join the Halloween Classroom Door Showdown conversation on Best Value Copy's Facebook page and tell us which design you would actually use, plus the detail that makes it work for your students.
All four designs appear together in the Facebook graphic, so you can choose there without opening the article. Come back to the print plans when you are ready to make your favorite.


